Every once in a while, you should check your PC components: what graphics card you have, what RAM you have, what CPU, or even what motherboard or other peripherals you might have. In this article, we will show you how to identify your PC components on Windows 11 using standard features from your Windows installation and third-party tools.
Identifying components using the “Settings” app
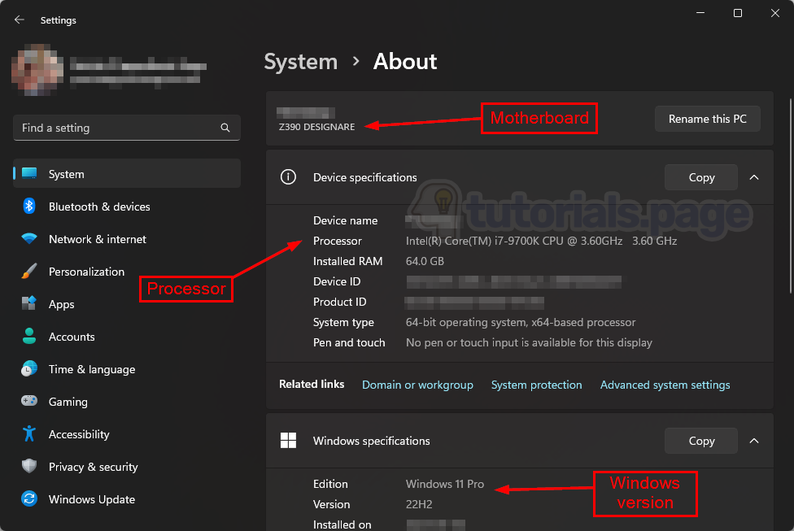
The first option comes built-in with Windows 11: you can use the Windows 11 “Settings” app to identify some of your PC components. This will show you the following:
- Processor (CPU)
- Motherboard
- Amount of RAM
- Version of Windows 11
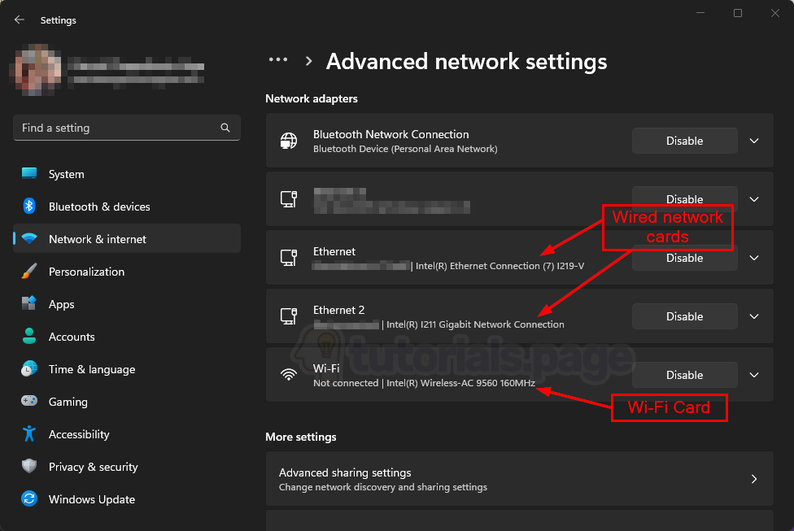
- Network (ethernet) & Wi-Fi card
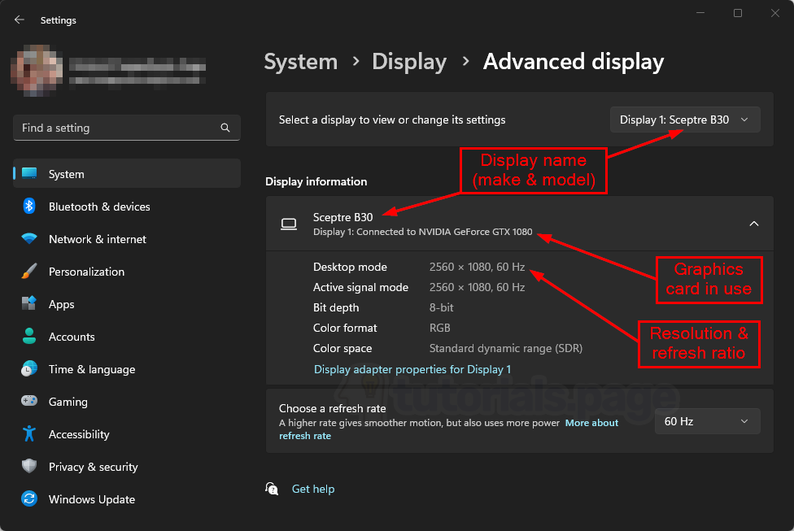
- Graphics card and screen
Finding Processor, Motherboard, RAM and Windows 11 version
To access the setting apps and find the above, follow these steps:
- Right-click the Windows logo on your taskbar
- In the menu that opens up, find “Settings” and click on it
- On the left side, there will be a menu with options. Find “System” and click on it (it might already be the one selected when you opened the “Settings” app)
- On the right side, find the “About” option
The following picture will show you the components with their names labeled in red, as well as what menu we’re using to find these components:
Finding network & Wi-Fi cards
To find your network and Wi-Fi cards, open the same “Settings” app as we did before, but now:
- Select on the right menu the option “Network & internet”
- Scroll down to “Advanced network settings”, then click it
You’ll see the Network and Wi-Fi cards listed. The following image will show you ours:
Finding graphics card and screen
In the same “Settings” app, but now:
- Go back to the “System” option, then click on “Display”
- Scroll down to “Related settings” then click on “Advanced display”
- The top part of the screen will state “Select a display to view or change its settings”, you can use this in case you have multiple monitors connected to your PC
This page will show you the graphics card and screen information per monitor. If you use multiple monitors, the same graphics card might be in use, and you can change between monitors using the dropdown at the top right part of the screen.
The following image will show you what ours looks like:
Identifying using the “Device Manager”
The second option to know what hardware you have is to use the “Device Manager” app. This will show you every single individual piece of hardware that is connected to your PC. This includes:
- Bluetooth devices
- Webcams
- Motherboard
- Hard drives or Solid-state drives
- Graphics Card
- Mouses & other devices to point
- Wired (ethernet) and wireless network cards
- Processor (CPU)
- Additional audio hardware like speakers and external headsets
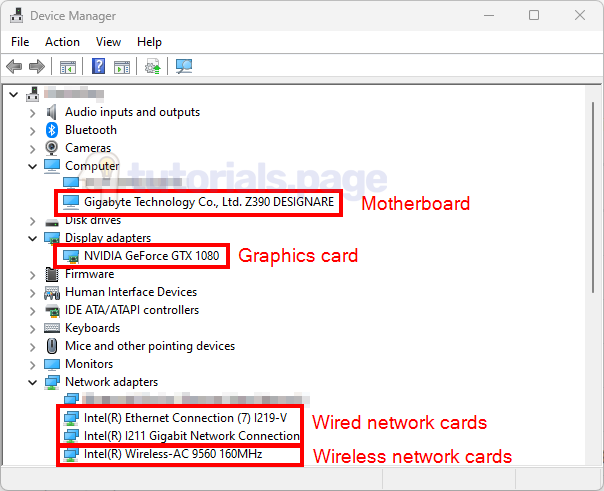
Since the list is quite exhaustive, here’s the mapping where you can find each component:
| Hardware Component | Name inside the “Device manager” app |
|---|---|
| Bluetooth devices | Bluetooth |
| Webcams | Cameras |
| Motherboard | Computer |
| Hard drives / Solid state drives | Disk drives |
| Graphics Card | Display adapters |
| Mouse & other devices to point | Mice and other pointing devices |
| Wired & wireless network cards | Network adapters |
| Processor (CPU) | Processors |
| Audio hardware | Sound, video and game controllers |
An example picture of what some components look like when expanded is shown below. You can compare some of the visible pieces to the information shown in the previous section:
Identifying using third-party tools
The third option is to use third-party tools. These tools may show you more information than the previous two options, but they will also require you to install them. The following tools are available.
Speccy
Speccy is a free tool that will show you a lot of information about your PC. It will show you every piece of hardware connected to your PC, which includes all the components listed in the previous sections.
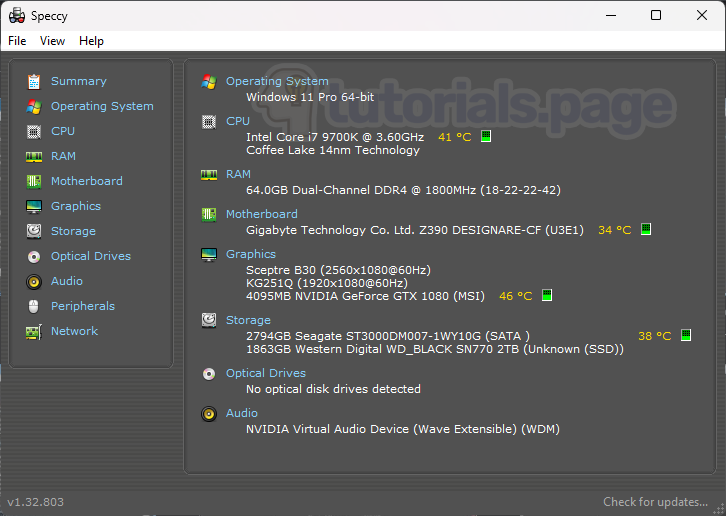
You can download Speccy from this link , which will take you straight to the download page.
Piriform, the company behind Speccy, has been acquired by Avast. Previously, Piriform bundled some adware (applications that add advertising to your PC when they run) with their Speccy installer.
While this isn’t the case anymore, we still recommend you be careful when installing Speccy. Say “no” to any additional software that might be bundled with Speccy.
Consider using CPU-Z if you’re still worried.
CPU-Z
Another super simple and helpful tool is CPU-Z. This tool will show you all the information the other apps here will show you. Engineers and hardware enthusiasts like CPU-Z due to its roots in the hardware and overclocking community.
To download, head over to the CPU-Z page then find under “Classic Versions” the file named “Setup • English”. It’s the one with two cogs on the left. Click on it to take you to its specific download page. There, you should see a big “Download Now!” button. Click on it to start the download.
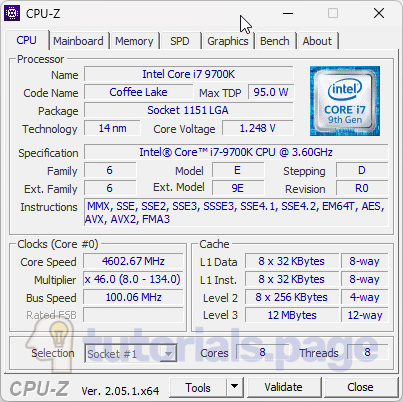
The program has several tabs with information about your computer:
- The first tab is about your CPU and will show information quite in-depth (with things like clock speeds, family, code name, the speed and more).
- The second tab is about your motherboard, showing you information like the manufacturer, model, BIOS version, and more.
- The third tab is about your RAM, showing you information like the manufacturer, model, speed, and more.
- The fourth tab provides additional information about each of the RAM slots in your computer.
- The fifth tab is about your graphics card, and it will show you information like the manufacturer, model, memory, and more.
- The last tab is a benchmarking tool for your CPU. It can perform stress tests and single and multi-thread benchmarks.
CPU-Z is a well-respected software among the hardware enthusiasts community. As such, it would be quite strange if this app could contain any kind of malware or adware. It is, by far, the safest option from this section.


